Creating Your First Extension
Prerequisites
Before starting this tutorial, please ensure you have:
-
EverShop version 2.0.1 or newer installed on your machine. If you haven't installed EverShop yet, please follow the installation guide.
-
A basic understanding of EverShop's module system. If you're unfamiliar with modules, please review the extension overview documentation.
-
Knowledge of EverShop's extension architecture. If you need to learn about extensions, please read the extension development guide.
Video Tutorial
Project Scenario
In this tutorial, we'll create an extension to enhance EverShop's product functionality. Our scenario involves an online bookstore that wants to allow customers to leave comments on products.
Our extension will implement the following features:
- A form allowing customers to submit comments on product pages
- A section displaying all comments for each product
Let's get started!
Step 1: Create a New Extension Project
Navigate to the root directory of your EverShop installation and locate the extensions folder. Create a new folder named productComment for our extension.
If the extensions folder doesn't exist yet, create it first.
./extensions
    └── productComment
        └── src
Step 2: Set Up NPM Workspace
Edit the package.json file in the root directory of your EverShop project and add the following configuration:
{
  "workspaces": [
    "extensions/*"
  ]
}
This step is optional and only required if your extension has dependencies. It allows npm to recognize your extensions as workspaces, making dependency management easier.
Step 3: Create a package.json and tsconfig.json File for Your Extension
Inside the productComment directory, create a package.json file with the following content:
{
  "name": "@evershop/productComment",
  "version": "1.0.0",
  "type": "module",
  "scripts": {
    "compile": "tsc && copyfiles -u 1 \"src/**/*.{graphql,scss,json}\" dist"
  },
  "devDependencies": {
    "typescript": "^5.0.0"
  }
}
This file defines your extension's name, version, and dependencies. The compile script is used to compile TypeScript files.
Next, create a tsconfig.json file in the same directory with the following content:
{
  "compilerOptions": {
    "module": "NodeNext",
    "target": "ES2018",
    "lib": ["dom", "dom.iterable", "esnext"],
    "esModuleInterop": true,
    "forceConsistentCasingInFileNames": true,
    "skipLibCheck": true,
    "declaration": true,
    "sourceMap": true,
    "allowJs": true,
    "checkJs": false,
    "jsx": "react",
    "outDir": "./dist",
    "resolveJsonModule": true,
    "allowSyntheticDefaultImports": true,
    "allowArbitraryExtensions": true,
    "strictNullChecks": true,
    "baseUrl": ".",
    "rootDir": "./src"
  },
  "include": ["src"]
}
That's it for the initial setup! Your extension directory structure should now look like this:
/extensions
    └── productComment
        ├── src
        ├── package.json
        └── tsconfig.json
Step 4: Add the Comment Form to the Product Page
First, create a pages folder structure to organize your extension components:
./extensions
    └── productComment
        └── src
            └── pages
We want to add our comment form to the product detail page, which has the route ID productView. You can verify this by examining the catalog module at @evershop/evershop/src/modules/catalog/pages/frontStore.
Create the necessary folder structure for our product page component:
./extensions
    └── productComment
        └── src
            └── pages
                └── frontStore
                    └── productView
                        └── CommentForm.tsx
Now, create a React component named CommentForm.tsx with the following content:
import React from "react";
import { Form } from "@components/common/form/Form";
import { Field } from "@components/common/form/Field";

export default function ComponentForm() {
  return (
    <div className="product-comment-form">
      <h3>Your comment</h3>
      <Form id="comment-form" method="POST" btnText="Submit" isJSON={true}>
        <Field
          name="user_name"
          label="Your Name"
          type="text"
          validationRules={["notEmpty"]} // This field is required
        />
        <Field
          name="comment"
          label="Your Comment"
          type="textarea"
          validationRules={["notEmpty"]} // This field is required
        />
      </Form>
    </div>
  );
}
We're using EverShop's Form and Field components to create a simple comment form with name and comment fields. At this point, the form doesn't have any submission logic, which we'll implement later.
To position our form in the left column of the product page, we need to update the CommentForm.tsx file to include layout information:
import React from "react";
import type { ComponentLayout } from "@evershop/evershop/types/componentLayout";
import { Form } from "@components/common/form/Form";
import { Field } from "@components/common/form/Field";

export default function CommentForm() {
  return (
    <div className="product-comment-form">
      <h3>Your comment</h3>
      <Form id="comment-form" method="POST" btnText="Submit" isJSON={true}>
        <Field
          name="user_name"
          label="Your Name"
          type="text"
          validationRules={["notEmpty"]}
        />
        <Field
          name="comment"
          label="Your Comment"
          type="textarea"
          validationRules={["notEmpty"]}
        />
      </Form>
    </div>
  );
}


export const layout: ComponentLayout = {
  areaId: "productPageMiddleLeft",
  sortOrder: 50,
};
To see a list of available areas where you can place components, check the file @evershop/evershop/src/modules/catalog/pages/frontStore/productView/Layout.js.
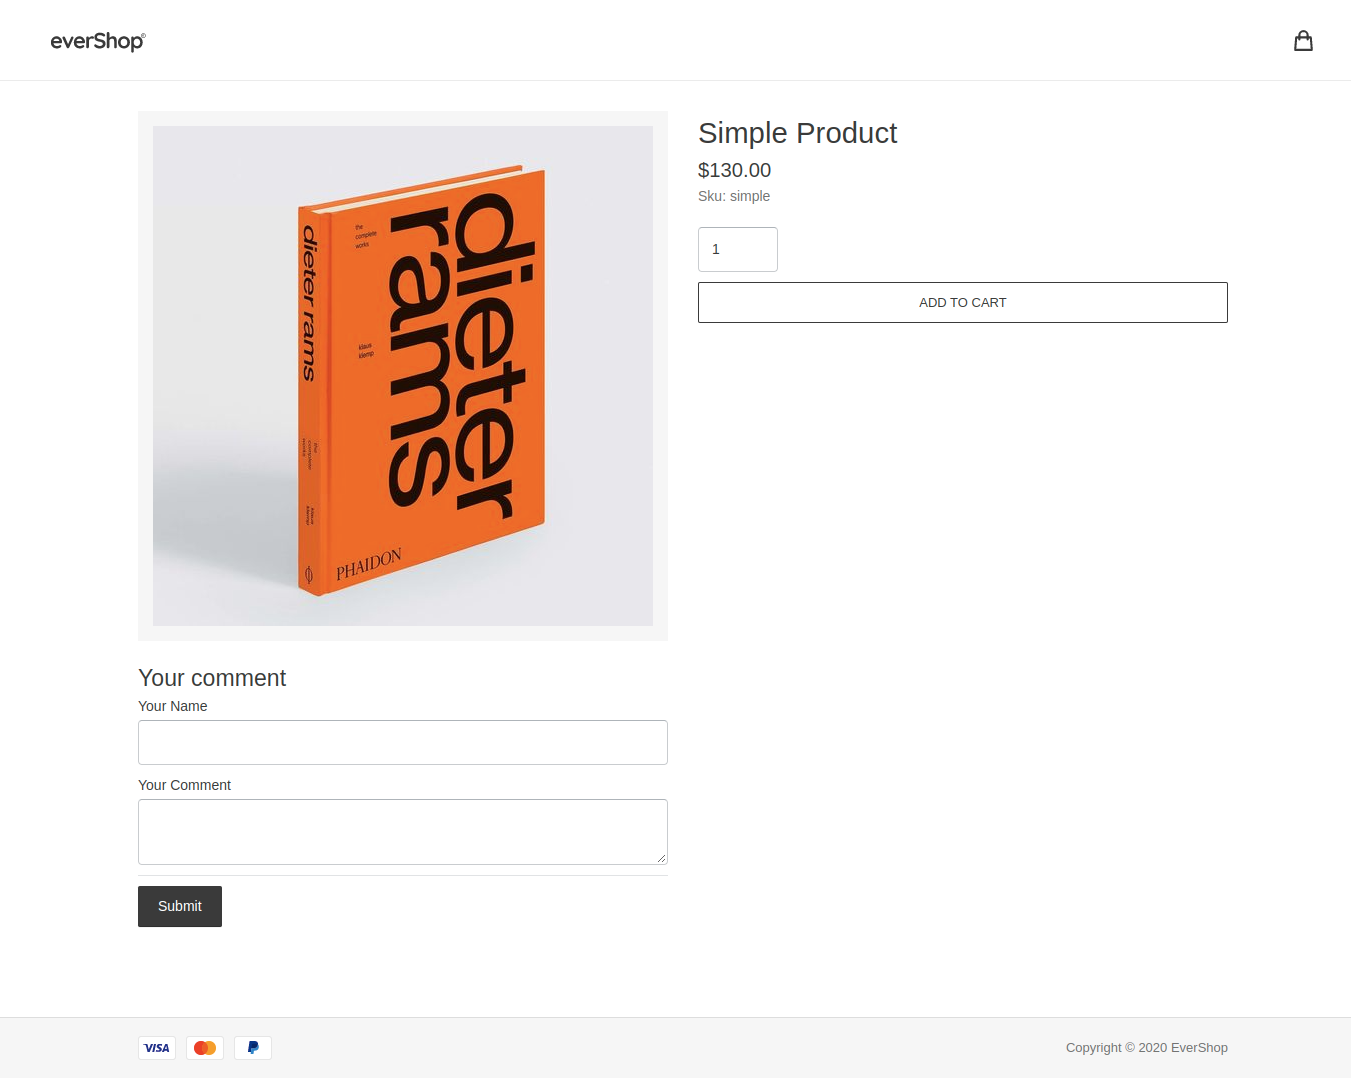
With this layout configuration, your product page should now display the comment form in the left column:
Step 5: Create a Database Table for Comments
To store user comments, we need to create a database table. EverShop provides a migration system that makes this process straightforward.
Create a migration folder inside the src directory of your extension:
./extensions
    └── productComment
        └── src
            ├── migration
            │   └── Version-1.0.0.ts
            └── pages
                └── frontStore
                    └── productView
                        └── CommentForm.tsx
The migration folder must be inside src/, not at the root of the extension. The TypeScript compiler will compile it to dist/migration/, where EverShop looks for migration files at runtime.
In the migration folder, create a file named Version-1.0.0.ts:
import { execute } from "@evershop/postgres-query-builder";

export default async (connection) => {
  await execute(
    connection,
    `CREATE TABLE IF NOT EXISTS "product_comment" (
      "comment_id" INT GENERATED ALWAYS AS IDENTITY (START WITH 1 INCREMENT BY 1) PRIMARY KEY,
      "product_id" INT NOT NULL,
      "user_name" VARCHAR(255) NOT NULL,
      "comment" TEXT DEFAULT NULL,
      "created_at" TIMESTAMP NOT NULL DEFAULT NOW(),
      CONSTRAINT "FK_PRODUCT_COMMENT" FOREIGN KEY ("product_id") REFERENCES "product" ("product_id") ON DELETE CASCADE
    );`
  );
};
Each migration file exports a default function that receives a PostgreSQL connection. This migration creates a product_comment table with the necessary fields. The connection is already inside a transaction — if the migration fails, all changes are rolled back automatically.
For simplicity, we're using just four columns: comment_id, product_id, user_name, and comment. In a production environment, you might want to add more fields such as email, rating, status (for moderation), updated_at, etc.
Step 6: Create an API Endpoint for Comment Submission
Now we need to create an API endpoint to handle form submissions and save comments to the database.
Create an api folder in your extension directory:
./extensions
    └── productComment
        └── src
            └── api
                └── addComment
                    ├── route.json
                    ├── validateComment.ts
                    └── [validateComment]saveComment.ts
API Route Definition
In the addComment folder, create a file named route.json:
{
  "methods": [
    "POST"
  ],
  "path": "/comments",
  "access": "public"
}
This creates an API endpoint at /api/comments that accepts POST requests and is publicly accessible.
API Middleware Functions
For our API endpoint, we need middleware functions to validate and save the comment data.
You don't need to create a body parser middleware — EverShop automatically parses JSON request bodies for API routes.
1. Validate the Comment Data
Create a file named validateComment.ts to validate incoming data:
import type { EvershopRequest } from "@evershop/evershop/types/request";
import type { EvershopResponse } from "@evershop/evershop/types/response";

export default (request: EvershopRequest, response: EvershopResponse) => {
  const { body } = request;
  if (!body.product_id) {
    throw new Error("Product ID is required");
  }

  if (!body.user_name) {
    throw new Error("User name is required");
  }

  if (!body.comment) {
    throw new Error("Comment is required");
  }
};
This middleware ensures all required fields are present. In a production environment, you might implement more sophisticated validation, such as checking for logged-in users or filtering inappropriate content.
2. Save the Comment
Create a file named [validateComment]saveComment.ts to save validated comments. The [validateComment] prefix ensures this middleware runs after validation:
import type { EvershopRequest } from "@evershop/evershop/types/request";
import type { EvershopResponse } from "@evershop/evershop/types/response";
import { pool } from "@evershop/evershop/lib/postgres";
import { insert } from "@evershop/evershop/lib/postgres/query";

export default async function saveComment(
  request: EvershopRequest,
  response: EvershopResponse,
  next: Function
) {
  try {
    const {
      body: { product_id, user_name, comment },
    } = request;
    // Insert the comment into the database
    const result = await insert("product_comment")
      .given({
        product_id,
        user_name,
        comment,
      })
      .execute(pool);
    response.json({ success: true, data: { comment: result } });
  } catch (error) {
    next(error);
  }
}
This middleware saves the comment data to the database and returns a success response, or passes any errors to the next error-handling middleware.
You can test the API endpoint using curl:
curl -X POST \
  http://localhost:3000/api/comments \
  -H 'Content-Type: application/json' \
  -d '{
  "product_id": 1,
  "user_name": "John Doe",
  "comment": "This is a comment"
}'
If successful, you should receive:
{
  "success": true,
  "data": {
    "comment": {
      "commentId": 1,
      "userName": "John Doe",
      "comment": "This is a comment",
      "createdAt": "2023-01-01T00:00:00Z"
    }
  }
}
Now, let's update our CommentForm component to use this API endpoint:
import React from "react";
import type { ComponentLayout } from "@evershop/evershop/types/componentLayout";
import { Field } from "@components/common/form/Field";
import { Form } from "@components/common/form/Form";

export default function CommentForm({ action, product }) {
  const [error, setError] = React.useState(null);

  const onSuccess = (response) => {
    if (response.success) {
      window.location.reload();
    } else {
      setError(response.message);
    }
  };

  return (
    <div className="product-comment-form">
      <h3>Your comment</h3>
      {error && <div className="error">{error}</div>}
      <Form
        id="comment-form"
        action={action}
        method="POST"
        btnText="Submit"
        onSuccess={onSuccess}
        isJSON={true}>
        <Field
          name="user_name"
          label="Your Name"
          type="text"
          validationRules={["notEmpty"]}
        />
        <Field
          name="comment"
          label="Your Comment"
          type="textarea"
          validationRules={["notEmpty"]}
        />
        <Field type="hidden" name="product_id" value={product.productId} />
      </Form>
    </div>
  );
}

export const layout: ComponentLayout = {
  areaId: "productPageMiddleLeft",
  sortOrder: 50,
};

export const query = `
  query {
    action: url(routeId: "addComment")
    product: product(id: getContextValue("productId")) {
      productId
    }
  }
`;
Step 7: Build the GraphQL Schema for Comments
Now we need to create a GraphQL schema to fetch and display comments on the product page.
Create the Comment GraphQL Type
First, create the directory structure for your GraphQL types:
./extensions
    └── productComment
        └── src
            └── graphql
                └── types
                    └── Comment
Create a file named Comment.graphql in the Comment directory:
type Comment {
  commentId: Int!
  userName: String
  comment: String
  createdAt: String
}

extend type Query {
  comments(productId: Int!): [Comment]
}
This defines a Comment type with the necessary fields and extends the root Query type with a comments field that accepts a productId parameter.
Create the GraphQL Resolver
Next, create a resolver for the comments field. Create a file named Comment.resolvers.ts in the same directory:
import { camelCase } from "@evershop/evershop/lib/util/camelCase";
import { select } from "@evershop/postgres-query-builder";

export default {
  Query: {
    comments: async (root, { productId }, { pool }) => {
      const comments = await select()
        .from("product_comment")
        .where("product_id", "=", productId)
        .execute(pool);

      return comments.map((comment) => camelCase(comment));
    },
  },
};
This resolver fetches comments for a specific product from the database and converts the field names to camelCase for consistency with the GraphQL schema.
Step 8: Display Comments on the Product Page
Finally, let's create a component to display comments. Create a file named Comments.tsx in the productView directory:
./extensions
    └── productComment
        └── src
            └── pages
                └── frontStore
                    └── productView
                        └── Comments.tsx
Add the following code to Comments.tsx:
import React from "react";
import type { ComponentLayout } from "@evershop/evershop/types/componentLayout";
import "./Component.scss";

export default function Comments({ comments = [] }) {
  return (
    <div id="productComments">
      <h3>Comments</h3>
      <ul className="comment-list">
        {comments.map((comment) => (
          <li key={comment.commentId}>
            <div className="user-name">{comment.userName}</div>
            <p className="comment">{comment.comment}</p>
          </li>
        ))}
      </ul>
    </div>
  );
}

export const layout: ComponentLayout = {
  areaId: "productPageMiddleLeft",
  sortOrder: 45,
};

export const query = `
  query {
    comments(productId: getContextValue("productId")) {
      commentId
      userName
      comment
      createdAt
    }
  }
`;
This component displays a list of comments for the current product, positioned above the comment form.
Add Styling for Comments
Let's add some basic styling for the comments. Create a file named Component.scss in the productView directory:
.comment-list {
  margin-bottom: 20px;
  li {
    padding: 10px 0;
    border-bottom: 1px solid #eee;
    :last-child {
      border-bottom: 0;
    }
  }
  .user-name {
    font-weight: bold;
    margin-bottom: 5px;
  }
  .comment {
    font-style: italic;
  }
}
Update the Comments.tsx file to import the styles:
import React from "react";
import type { ComponentLayout } from "@evershop/evershop/types/componentLayout";
import "./Component.scss";

export default function Comments({ comments = [] }) {
  return (
    <div id="productComments">
      <h3>Comments</h3>
      <ul className="comment-list">
        {comments.map((comment) => (
          <li key={comment.commentId}>
            <div className="user-name">{comment.userName}</div>
            <p className="comment">{comment.comment}</p>
          </li>
        ))}
      </ul>
    </div>
  );
}

export const layout: ComponentLayout = {
  areaId: "productPageMiddleLeft",
  sortOrder: 45,
};

export const query = `
  query {
    comments(productId: getContextValue("productId")) {
      commentId
      userName
      comment
      createdAt
    }
  }
`;
Step 9: Enable the Extension
The final step is to enable our extension in the EverShop configuration. Open the configuration file for your environment (e.g., development.json) in the /config directory and add the following code to the system section:
{
  "system": {
        ...
        "extensions": [
            {
                "name": "productComment",
                "resolve": "extensions/productComment",
                "enabled": true
            }
        ]
    }
}
Now, start the server and navigate to a product page. You should see both the comment form and the list of existing comments.
npm run dev
Step 10: Build and Test Your Extension in Production Mode
First, compile your extension's TypeScript to JavaScript. Navigate to your extension directory and run:
cd extensions/productComment
npm run compile
This compiles the src/ directory to dist/, making the extension ready for production.
Then, from your EverShop root directory, build and start the production server:
cd ../..
npm run build
npm run start
Conclusion
Congratulations! You've successfully built a custom extension for EverShop. In this tutorial, you've learned:
- How to create an extension project structure
- How to add React components to existing pages
- How to use EverShop's layout system to position components
- How to create database tables using migrations
- How to implement RESTful API endpoints
- How to define GraphQL schemas and resolvers
- How to add styling to your components
- How to configure and enable your extension
Publishing Your Extension as an NPM Package
If you want to share your extension with the community, you can publish it as an NPM package. Here's how:
- Navigate to your extension directory:
cd extensions/productComment
- Publish your package to the npm registry:
npm publish --access public
Once published, others can install your extension using npm:
npm install your-package-name
When using an npm-installed extension, the configuration would look like:
{
  "system": {
        ...
        "extensions": [
            {
                "name": "productComment",
                "resolve": "node_modules/your-package-name",
                "enabled": true,
                "priority": 10
            }
        ]
    }
}
The source code for this tutorial is available in the EverShop GitHub repository.